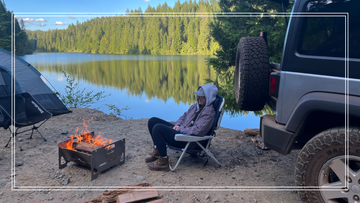
Overlanding has seen a surge in popularity among outdoorsmen & women, and adventure seekers. The urge to explore remote terrains, embark on epic off-the-beaten-path journeys, and seek solitude amidst nature has led many daring individuals to convert their vehicles into houses on wheels.
These individuals have fully embraced the self-reliant spirit of overlanding.
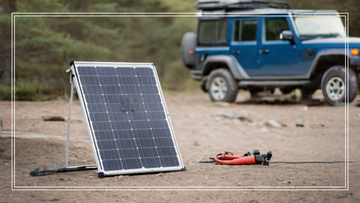
One critical feature of any overland vehicle is an overland solar setup. Converting your vehicle into an overland rig equipped with a reliable solar power system is a game-changer for beginning overlanders, offering freedom, independence, and sustainability on the road.
Once considered complex and expensive, solar power systems are now becoming more accessible and affordable for people seeking off-grid solutions.
Solar energy is an eco-friendly and sustainable solution that can power your electronics, lighting, fridge, and more, allowing you to extend your off-grid adventures without compromising on comfort or convenience.
Here, we'll break down the elements of an effective overland solar setup and highlight some of the best portable solar panel options for beginning overlanders.
{Shop Renlicon’s Overlanding Gear Basics}
Components of an Overland Solar Setup
To set up solar panels for overlanding, you’ll need to have an understanding of the basics.
First, we’ll break the overland solar setup into a couple of bit-sized components to give you a starting point, and then we’ll get into the specifics of installation and recommended brands.
Let’s get started!
Solar Panels
The cornerstone of your overland solar setup is the solar panel itself. Renogy, Goal Zero, and Jackery are reputable brands (more information below) offering durable, efficient overland solar panels in various sizes and wattages suitable for your overlanding needs.
You’ll want to do research on both the technology itself and the region(s) in which you plan to travel before purchasing any equipment. Different regions have varied weather which can affect access to solar energy. Also, different types of solar panels can have a higher yield than others.
Make sure your panels are a good fit for the type of overlanding you plan to do.
Power Requirements: Evaluate your energy consumption needs. If you have a large fridge, multiple gadgets, and extensive lighting, you’ll need higher-wattage solar panels for overlanding. On the other hand, if your energy requirements are modest, a single panel might be perfect for you, especially if you charge smaller devices or maintain a low-power system.
Panel Placement: The placement of your overland solar panels significantly impacts their efficiency. Mounting panels on the roof, hood, or awnings can maximize sun exposure during travel or camping. However, be mindful of potential shadows from equipment, trees, or other obstructions, as these can impede the efficiency of your device.
Remember that solar panels aren’t connected to the electricity grid. They must be cared for and carefully placed. Forgetting to expose them to sunlight could mean living without power until recharged.

Charge Controllers
A charge controller is another important device in any overland solar setup, acting as a regulator between the solar panels and the batteries. It prevents overcharging, maintains battery health, and optimizes power flow.
There are two main types of charge controllers: MPPT (Maximum Power Point Tracking) and PWM (Pulse Width Modulation). Each has distinct advantages depending on your system size and budget.
Batteries
The energy harnessed by your solar panels needs to be stored for later use, and this is where batteries come into play.
For overlanding, deep-cycle batteries like AGM, lithium, or gel cells are popular choices due to their durability and extended charge cycles. These batteries retain charge longer and provide reliable power when sunlight isn't available.
Wiring and Connectors
Connecting the solar panels, charge controller, and batteries requires proper wiring, connectors, and appropriate insulation. Remember to check the compatibility between each of these components and use the correct gauge wiring for the safety and optimal performance of your overland solar setup.
Installing Your Overland Solar Setup
Now comes the difficult part, installation.
Installing your overland solar setup may feel like a daunting task, but breaking the processes down into manageable steps can help you develop a better understanding of the things you’ll need to have in place.
Follow these steps below to successfully install your overland solar setup.
Planning Your Setup
Before you start the physical installation, planning your overland solar setup meticulously is crucial. Determine the best locations for panels, controllers, and batteries within your vehicle.
Depending on your rig's design, consider roof, hood, or side placements for optimal sun exposure. Draw out your plan on a sheet of paper, creating your own instruction manual for the process. Understanding all of the steps beforehand will help you remember every detail.
Mounting Solar Panels
Securely mounting overland solar panels is vital for durability and efficiency.
For roof installations, use durable brackets or racks specifically designed for your vehicle model to ensure stability. Additionally, seal any drilled holes with appropriate sealants to prevent leaks and ensure weather resistance.
Routing Cables
When routing cables from the panels to the charge controller and then to the batteries, use waterproof and UV-resistant cables to maintain system integrity. Utilize conduit or cable tracks along the vehicle's interior to protect wires from damage and keep your setup tidy.
Placing the Charge Controller and Batteries
Place the charge controller and batteries in a well-ventilated, easily accessible location within your vehicle. This will let the device receive airflow to prevent overheating. Insulation and protection against extreme temperatures are also important to consider for long-term battery health.
Configuring the System
Next, you’ll want to tackle configuration and system setup. Setting voltage parameters on the charge controller and checking for correct polarity connections are necessary steps for safe and efficient energy flow.
Refer to manufacturer guidelines for the specific settings required by the manual. Hopefully now, you’ll have your overland solar setup fully operationalBest Practices for Overland Solar Setup
To keep your overland solar setup in excellent working conditions, you’ll want to follow best practices like the ones listed below.
Regular Maintenance

Regular maintenance can increase the longevity and efficient performance of your overland solar setup. Periodically inspect connections, cables, and panels for wear, damage, or corrosion.
Clean your overland solar panels regularly to remove dust, debris, or grime that might hinder sunlight absorption.
Monitoring and Managing Power
Understanding your solar system's capabilities and limitations will help you efficiently manage your energy during extended overland trips.
Monitor power levels, know your energy consumption, and adjust usage accordingly to maximize the system's effectiveness.
Selecting the Best Solar Panels for Overlanding
Choosing the best overland solar panels for your setup depends on various factors, including your power needs, vehicle type, and budget. Here are some top options to consider:
Renogy 100W Monocrystalline Solar Panel: Known for its high efficiency and durability, this panel is a popular choice among overlanders. It's compact, lightweight, and can withstand harsh weather conditions, making it ideal for off-road adventures.
Goal Zero Boulder 100 Briefcase: This foldable panel is perfect for those who need a portable and efficient solution. It comes with a sturdy frame and kickstand, allowing you to place it in the best position for maximum sun exposure.
Jackery SolarSaga 100W Solar Panel: This panel is lightweight and portable, designed specifically for use with Jackery's portable power stations. It's an excellent option for overlanders who own a Jackery Power Station and need a flexible and easy-to-deploy solar solution.
Zamp Solar 140-Watt Portable Solar Panel Kit: This kit includes a foldable solar panel with an integrated charge controller, making it easy to set up and use. It's designed for durability and efficiency, providing reliable power for your overlanding needs.
BioLite SolarPanel 10+: This compact and efficient panel comes with an integrated sundial for optimal alignment with the sun. It's lightweight and portable option for your overland solar setup.
Setting up an overland solar system is a transformative step for any beginning overlander, providing the freedom to explore remote areas without sacrificing comfort or convenience.
By carefully selecting the right components, planning your setup, and adhering to best practices, you can create a reliable and efficient solar power system tailored to your overlanding needs.
At Renlicon, we’re dedicated to making sure you have the information and equipment you need to explore all of life’s greatest adventures.
Now that you understand the basics of setting up a solar system for your overlanding vehicle, be sure to take a look at some of our helpful outdoor products like the Out-In-About Box™.
This 8-compartmentalized organizer is perfect for most overlanding vehicles, whether you have space in the back of a truck bed, or you’ve converted a van or camper, you’ll definitely want to have the Out-In-About Box™ at your disposal. Pick yours up today and overland the Renlicon way!